

I informed y’all in a earlier submit about how a really form and beneficiant reader supplied to print my panorama design plan for me, and he or she had the aptitude of printing it HUGE. So I took her up on her very beneficiant provide and had the panorama design printed 52″W x 78″H. I want y’all might see this factor in particular person as a result of it’s magnificent. Nevertheless it additionally offered a dilemma. How on this planet was I going to mount and body a HUGE print like that?
When you’re new round right here, that is the panorama design I’m speaking about…
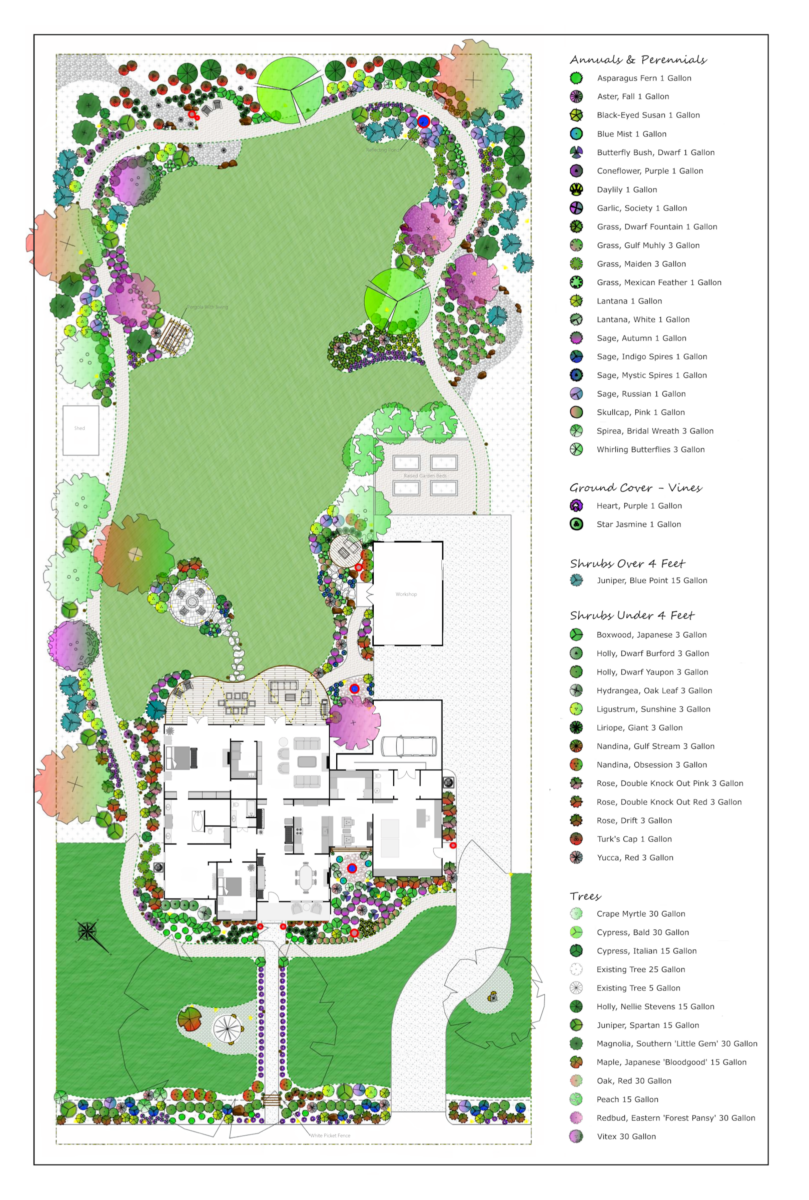
Matt (my husband) had purchased that panorama design for me about two years in the past. I met with an area panorama designer and informed him all of my needs and imaginative and prescient for our one acre lot, and that’s the design he got here up with. I feel it’s so fairly, so I’ve been desirous to have it printed and dangle it on a wall ever since I noticed it the primary time.
With the print being so huge, I although the simplest factor could be to mount the print on plywood, after which body it and dangle it. Tremendous easy, proper? So a few days in the past, I headed to House Depot to select up a chunk of plywood for this undertaking, and it wasn’t till I had parked and was getting out of the automotive that it dawned on me…this factor is 52″ x 78″!! A chunk of plywood is just 48″ extensive!
So then I needed to cease and rethink my plan. What I got here up with was a plan to mainly construct an enormous cradle wooden panel, which is strictly what I used to mount my little resin petri discs on. It’s mainly a body of wooden with a strong piece of plywood or MDF hooked up to the highest to create a wooden canvas.

Besides that as an alternative of it being a tiny 5″ x 5″, I wanted it to be about 150 instances that measurement. 😀
And since I at all times work alone, one other consideration I needed to work by means of was whether or not or not I’d be capable of construct this large cradle wooden panel after which mount it on the wall on my own. Since I’m solely 5 ft tall, which signifies that my arm span from fingertip to fingertip is 5 ft, I severely doubted my capacity to raise a 52″ x 78″ cradle wooden panel off the ground and hoist it onto no matter hanger I made a decision to make use of. So as an alternative, I made a decision to construct the cradle wooden panel immediately on the wall.
I began through the use of my degree, framing sq., straight edge (i.e., a chunk of additional lumber), and a pencil to mark off the location of the underside proper nook. I want that I might have constructed this simply above the baseboard, however as you’ll be able to see, I needed to clear {the electrical} outlet.

Subsequent, I used a stud finder to mark the location of the wall studs alongside the underside horizontal line.

I minimize a chunk of two″ x 2″ lumber to 52″ extensive, after which used the wall markings to mark the location of the studs on the lumber. I pre-drilled screw holes, after which used my largest bit to drill about 1/2-inch into the lumber in order that I might countersink my screws, and in order that they might be lengthy sufficient to enter the studs.

I hooked up that horizontal board to the wall alongside the marked line utilizing 2.5-inch screws. I used my degree to double test that the road was degree.

Subsequent, I minimize and hooked up the vertical 2″ x 2″ items. I didn’t screw these to the wall, and I didn’t make certain they have been in studs. For the reason that weight of those items can be held by the underside horizontal piece, I solely wanted to make certain that these items have been firmly hooked up to the wall and to the underside piece. I began through the use of my nail gun and 2-inch 16-gauge nails to nail by means of the underside horizontal piece and into the top of the vertical items. I used three nails on all sides.

With these items hooked up to one another, I then used my framing sq. to ensure the vertical items have been completely sq. with the underside piece, after which nailed the vertical piece on the correct to the wall utilizing those self same 2-inch 16-gauge nails.

Subsequent, I hooked up the highest piece. This one was screwed into studs similar to the underside piece, and it was additionally nailed to the vertical piece similar to I did on the underside corners.

After which lastly, I completed up by nailing the left vertical piece to the wall and to the highest horizontal piece.

To guarantee that the vertical items stayed firmly in opposition to the wall, I additionally went again and added nails going diagonally from the within fringe of the wooden and into the wall. The aim of that’s to create rigidity. With the nails going by means of the entrance of the wooden and straight into the wall, and the nails going diagonally from the within fringe of the wooden and into the wall, these vertical items gained’t draw back from the wall.

And once more, the vertical items don’t actually have to hold weight as a result of the burden is resting on the underside piece, which is screwed into studs, and the highest piece can also be screwed into studs in order that it gained’t draw back from the wall.

For the face of the cradle wooden panel, I had to make use of two items of plywood as a result of, once more, plywood is just 48 inches extensive and this panel is 52 inches extensive. So I wished so as to add a chunk of lumber horizontally the place the 2 items of plywood would meet in order that I might nail the perimeters of the plywood to this piece. I didn’t need to buy one other piece for this, so I simply used a scrap, which was just some inches shy of the entire width. That’s not an issue so long as it is usually firmly hooked up to the wall. So I hooked up it in the identical means because the vertical items, with nails going immediately by means of the entrance into the wall, and the nails going diagonally by means of the highest and backside edges and into the wall.

Then I used to be prepared to connect the primary piece of plywood. I began with the little piece in order that I might extra simply maintain it into place whereas nailing it to the wooden body.

After which I did the larger piece on prime in order that I might relaxation the burden of the larger piece on the underside piece whereas I nailed it into place.

You’ll discover that there’s a spot between the items that will get greater in the direction of the correct aspect. I had checked and double checked my body to make certain the corners have been completely sq., so when the second piece of plywood didn’t line up completely with the body, I knew the problem was the plywood. So I needed to straighten it out across the edges, which created that hole between the 2 items. Issues like that may occur (and have occurred to me many instances) once I let House Depot or Lowe’s minimize my plywood for me.
I wasn’t fairly positive what to do about that hole. Wouldn’t it present by means of the print? Wouldn’t it create an unpleasant ripple? I acquired the print out and tacked it to the panel to find out tips on how to proceed.

This paper is tremendous thick, however I might nonetheless see a distinction in colour at that hole. And I do plan to color the entire panel white earlier than mounting the print, so leaving the hole wasn’t actually an possibility.

So then I needed to determine tips on how to fill the hole. Caulk didn’t look like possibility. I wanted one thing that might be sanded clean. However wooden filler didn’t look like an affordable possibility as a result of the hole was too extensive. That a lot wooden filler wouldn’t solely take endlessly to dry, however would undoubtedly crack, requiring a number of coats and plenty of hours of ready.
The choice I assumed was the perfect was to make use of drywall tape and dirt.

In order that’s the place I left the undertaking. It should in all probability want at the very least yet one more coat of drywall mud after I sand what’s there. (I’m not good in any respect with drywall mud.) After which I’ll prime and paint the panel, then mount the print, after which body the entire thing.

After all, I might have simply opted to connect the print on to the wall, after which use image body molding to border it. I got here very near doing that, however in the long run, I simply felt like that wouldn’t give the print the prominence it deserves. It could make it look extra like wallpaper than a separate piece of framed artwork. And I feel this positively deserves to be a separate piece of framed artwork, so ensuring that it tasks from the wall two inches will make it seem like it’s mounted on a gallery wrapped canvas. This print deserves that.

Addicted 2 Adorning is the place I share my DIY and adorning journey as I rework and embellish the 1948 fixer higher that my husband, Matt, and I purchased in 2013. Matt has M.S. and is unable to do bodily work, so I do the vast majority of the work on the home on my own. You can learn more about me here.
Trending Merchandise


